Hydroponic roots turn brown because of harmless nutrient staining, oxygen-starved tissue, heat stress, accumulated residue, or root disease, and the correct response depends on distinguishing those conditions quickly. Healthy stained roots remain firm and usually produce pale new tips, while damaged roots become soft, slimy, easily detached, or foul-smelling. Check reservoir temperature, aeration, pump operation, water level, pH, and debris before changing the nutrient solution. Remove dead tissue and clean contaminated equipment when decay is present, but avoid aggressive disinfectants or unnecessary root cutting when discoloration is only staining.
Brown Roots Are Not Always Root Rot
Root color alone is a poor diagnosis. Mineral nutrients, organic additives, humic products, clay particles, and residue from growing media can tint otherwise functional roots tan or brown. Some crops also develop darker, older root tissue while continuing to produce firm white or cream-colored tips. Treating every color change as an infection can create a second problem through unnecessary pruning, harsh cleaning, or repeated solution replacement.
Texture, odor, and plant performance provide stronger evidence. Stained roots generally feel firm, retain their branching structure, and resist gentle handling. The reservoir smells like its normal nutrient solution rather than a drain or decaying vegetation. Leaves remain supported, and the plant continues using water. New root tips may be pale even when older sections have absorbed pigment from the solution.
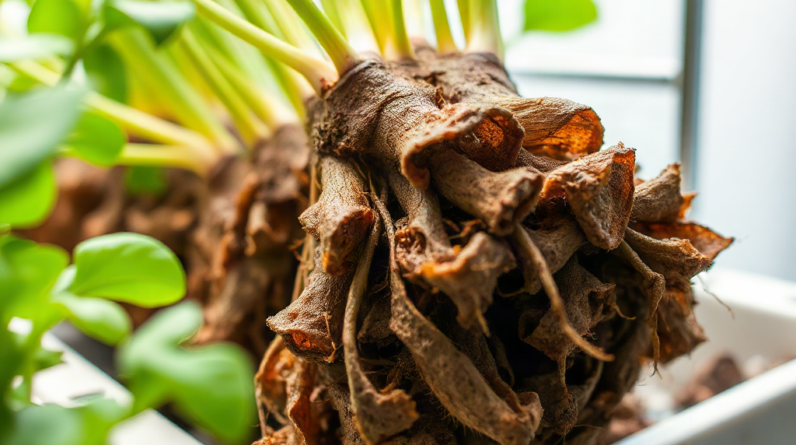
Decaying roots behave differently. Affected tissue may feel slick, mushy, or hollow, and the outer layer can slip away when touched. Fine feeder roots disappear first, leaving thicker strands with limited branching. A sour, swampy, or rotten odor raises concern because it suggests decomposing organic matter and microbial activity rather than simple staining. Above the reservoir, the plant may wilt despite having ample solution, lose vigor, or develop nutrient-stress symptoms because damaged roots cannot regulate water and ion uptake normally.
Consider a deep-water culture plant fed with a dark humic supplement. Its roots may turn tea-colored within a day while remaining crisp and actively extending. Replacing the reservoir repeatedly would waste nutrients without addressing a real fault. By comparison, a plant whose roots darken after an air pump stops may show limp foliage, slippery root surfaces, and little fresh growth. Those observations point toward oxygen stress and tissue decline.
A white paper towel can help separate surface staining from structural damage. Gently press a small accessible root section without pulling or scrubbing it. Nutrient pigment may transfer to the towel while the root remains intact. Degraded tissue tends to smear, flatten, or shed its outer layer. This is only a field check, not a laboratory identification, but it prevents color from becoming the sole basis for action. Readers comparing symptoms can also use this focused overview of Hydroponic roots turning brown: causes and response alongside their system records.
Conditions That Damage Hydroponic Roots
Low dissolved oxygen is a common pressure point because roots need oxygen for respiration even when the leaves receive abundant light. Warm solution holds less oxygen than cool solution, while roots and microorganisms continue consuming it. A reservoir can therefore become stressful when high temperature, a crowded root mass, weak circulation, and organic debris occur together. No single reading explains the entire root zone; the interaction matters.
A failed air pump is an obvious cause in deep-water culture, but partial failures are easier to miss. A kinked airline, clogged air stone, poorly positioned return line, or dense root bundle surrounding the diffuser can reduce oxygen delivery without stopping visible bubbles. In nutrient film technique, roots suffer when flow becomes too shallow or stops long enough for sections of the channel to dry. In drip systems, blocked emitters can leave one plant oxygenated but dehydrated while neighboring plants appear normal.
Excessively warm solution accelerates the problem. A reservoir heated by grow lights, pumps, or a warm floor may remain hot through the plant’s dark period. Chilling the solution aggressively is not automatically better: abrupt temperature swings can stress roots, create condensation, and complicate nutrient management. The practical objective is a stable root environment appropriate for the crop, not the coldest achievable reservoir.
Organic matter creates another route to browning. Dead root fragments, algae, fallen leaves, unwashed media, and sugary additives can supply food for microbial growth. Light entering the reservoir encourages algae, which consumes oxygen when it respires and decomposes. Disease-associated organisms may then exploit weakened tissue. Brown roots do not identify a particular pathogen, however, and visual inspection cannot confirm which organism is present.
Chemical and mechanical injury can resemble biological decay. A solution mixed at excessive strength may draw water away from root cells, while severely unsuitable pH can disrupt nutrient availability and irritate sensitive tissue. Concentrated pH adjuster poured directly onto roots can burn a localized area. Roots may also be crushed by net pots, exposed to a dry air gap after a sudden water-level change, or torn during reservoir service. The common mistake is adding a treatment before checking whether equipment, temperature, mixing practice, or physical damage created the initial injury.
A Diagnostic Check Before Taking Corrective Action
Diagnosis should move from system-wide faults to plant-specific evidence. Begin with anything that can harm the whole crop quickly: circulation, aeration, solution temperature, water level, and pump operation. A reservoir full of affected plants suggests a shared environmental fault, while one declining plant among healthy neighbors points more strongly toward local injury, a blocked delivery point, or contamination around that plant.
Use clean hands or gloves and inspect several areas of the root mass under neutral light. Record whether the discoloration is uniform, concentrated near the crown, or limited to old roots. Compare firmness, odor, and the presence of pale growing tips. Then inspect the reservoir walls, tubing, emitters, filters, and air stones for biofilm, algae, sediment, or obstruction. Do not rely on a single root pulled from the darkest area.
A compact priority check keeps the investigation disciplined:
- Confirm delivery: verify that pumps, air stones, return lines, channels, and emitters are operating at the root zone rather than merely making noise.
- Measure conditions: check solution temperature, pH, and nutrient concentration with calibrated instruments, then compare the readings with the crop’s normal operating history.
- Inspect the solution: look for cloudiness, foam, sediment, algae, unusual odor, and decomposing plant material.
- Compare plants: note whether symptoms affect every site, one channel, or a single root crown.
- Assess progression: determine whether roots changed after a heat event, pump outage, additive change, transplant, or reservoir adjustment.
Trend information is more useful than an isolated reading. A pH value that appears acceptable at noon may conceal a rapid daily swing, and a reservoir that feels cool in the morning may overheat under peak lighting. Check at consistent times and inspect the system during its hottest operating period. If instruments have not been calibrated, verify them before making large corrections; bad measurements often lead to unnecessary nutrient or pH additions.
Plant behavior helps rank urgency. Mild discoloration with firm roots and normal growth can be monitored after removing obvious residue. Browning paired with wilting, odor, falling water uptake, or tissue that sloughs away calls for prompt intervention. A useful diagnosis connects a visible symptom to an operating event. The broader troubleshooting notes at Hydroponic roots turning brown: causes and response can be used as a record heading for temperatures, readings, maintenance, and symptom changes.
How to Stabilize the Root Zone and Support Recovery
Correction begins by restoring dependable oxygen and solution movement. Repair or replace failed pumps, clear blocked lines, reposition diffusers, and make sure dense roots are not preventing circulation through the mass. In recirculating equipment, confirm that solution reaches every channel or emitter. Additional aeration may help a marginal deep-water reservoir, but it cannot compensate indefinitely for excessive heat, decomposing material, or a pump that delivers nutrient unevenly.
If the solution smells abnormal, contains substantial debris, or has become cloudy during active root decline, move viable plants carefully and replace the solution with a correctly mixed batch. Clean the reservoir, lid, tubing, and removable equipment according to material-safe manufacturer directions. Rinse away cleaning residues before refilling. Avoid combining sanitizers, and do not improvise high concentrations around living roots. Sterile-style management and beneficial-microbe approaches require different inputs; mixing them casually can neutralize the intended biology or injure roots.
Remove loose dead material that detaches with minimal handling, but preserve firm tissue. Cutting deeply into a stressed root mass reduces the plant’s remaining capacity to take up water and creates fresh wounds. If only one plant is severely affected, isolating it may be more sensible than repeatedly disturbing the entire crop. A plant with extensive crown decay, collapsing roots, and continuing wilt may not recover even after the reservoir is corrected.
Address heat at its source rather than relying only on emergency ice bottles. Shade or insulate the reservoir, separate it from warm flooring, reduce radiant heat from lamps, improve room ventilation, and check whether a submerged pump is adding excessive heat. Frozen bottles can produce sharp local temperature changes and introduce contamination if their surfaces are dirty. A purpose-built chiller offers control in persistently hot rooms, but it adds cost, electricity use, and another maintenance point; passive heat control may be adequate for smaller systems.
Recovery should be judged by new growth, not by expecting old brown roots to become white. Useful signs include fresh pale root tips, firmer branching, improved leaf posture, stable water use, and an absence of spreading odor or slime. Failure is indicated by continued tissue loss, renewed cloudiness, worsening wilt, or browning that advances into newly formed roots. Check the system frequently during the first several days, but resist changing several variables at once. A measured response makes it possible to tell whether restored aeration, temperature control, cleaning, or nutrient correction actually improved the root zone.
Frequently Asked Questions
Can healthy hydroponic roots be brown?
Yes. Nutrient pigments, humic products, media dust, and aging can discolor firm, odor-free roots. Healthy new tips and normal plant growth support staining rather than decay.
Should brown roots be cut off?
Remove only loose, clearly dead material with clean tools. Cutting firm stained roots can reduce water uptake and create wounds without correcting the cause.
Does hydrogen peroxide fix hydroponic root rot?
It may temporarily suppress some microbes, but concentration, formulation, crop sensitivity, and system strategy matter. It does not repair poor aeration, high temperature, debris, or damaged equipment.
How quickly should roots recover after correction?
Look for fresh root tips and improved plant posture over the following days. Existing damaged tissue may remain brown, and severely affected plants may continue declining despite corrected conditions.
Can too much nutrient solution turn roots brown?
A strong solution can injure roots, but dark nutrient ingredients can also stain them harmlessly. Check concentration, texture, odor, new growth, and the timing of the color change.
Conclusion
Brown color deserves inspection, not an automatic root-rot treatment. Start by separating firm staining from soft, odorous, spreading decay, then verify aeration, flow, temperature, water level, pH, nutrient concentration, and cleanliness. Correct shared equipment or environmental faults before reaching for additives, and replace contaminated solution when decomposition is evident. Preserve firm roots, remove only loose dead tissue, and clean equipment without leaving chemical residue. During recovery, watch the newest roots and the plant’s water use rather than waiting for old tissue to regain its original color. Fresh pale tips, stable foliage, and a clean-smelling reservoir indicate progress; continued slime, wilt, or loss of new roots means the cause remains active or the plant is too damaged to recover.